
Before you start
- Windows 10 or 11, 64-bit.
- Your own Steam copy of Halo: The Master Chief Collection with Halo 3 installed, its campaign included, as Steam installs it. You don't need to start the game through Steam: Project Reclaimer loads it from your installation folder.
- A graphics driver with OpenGL 3.0 or later (any recent driver), used for the menus.
- About 350 MB of free disk space for the caches the first launch builds.
Everyone you play with needs their own copy of the game too. Project Reclaimer contains no game files.
The main menu's scenery and Forge's dropships, walker and campaign AI come from Halo 3's campaign, so every player has the same Forge objects and can join any game that uses them. Without the campaign files the game says which ones are missing and doesn't start: in Steam, check that Halo 3 is installed under Halo: The Master Chief Collection → Properties → DLC, then use Installed Files → Verify integrity of game files.
Install and update
- Download the game clientGet
project-reclaimer-version.exefrom the download page and check its SHA-256 checksum. - Put it in its own folderFor example
C:\Games\ProjectReclaimer. Don't put it inside the game's installation folder.
Updates
From version 0.8.7 on, the game updates itself. When a newer release is out, the main menu shows Update available at the top right.
- Choose UpdateA window shows what's new in that release. Later closes it, and Release page opens the release in your browser.
- Choose Update & restartThe game downloads the new version, checks it against the release's checksums, puts it in place of the one you're running and starts again.
- Your settings, profile, maps and mods stay as they are.
- The file keeps its name, even one with an older version number in it, so shortcuts to it keep working. The main menu's bottom-right corner and Credits show the version you're running.
- The game looks for a new version when it starts and every few hours while it stays open.
- Versions before 0.8.7 can't update themselves: download the newest one from the download page once.
First launch
Double-click project-reclaimer-version.exe. The game opens in borderless fullscreen, filling your monitor at its own resolution; there is nothing else to start. To play in a window instead, set Display mode to Windowed in Settings → Graphics.
It finds the game in any of your Steam libraries. If it can't, it asks you for the folder: choose Halo The Master Chief Collection in steamapps\common in your Steam library. It remembers that folder for next time; Settings → Folders changes it later.
The first launch builds two caches from your installed game in %LOCALAPPDATA%\ProjectReclaimer: the game's text fonts, a few MB, and a library of every map's Forge objects, about 340 MB. This takes about half a minute on a typical PC. Later launches reuse them and start much faster. The first launch after each update builds the library again, once, and removes the old one; the loading screen then reads Building asset library. To keep the caches on another drive, choose a folder in Settings → Folders.
Your community profile
Choose a nickname and select Create profile. Your profile is a nickname plus a cryptographic key stored on your PC and protected by Windows. There is no account, email or password.
- Nicknames can be up to 15 characters: letters, numbers, spaces, hyphens and underscores.
- Nicknames aren't unique. Servers recognize you by your player ID, which comes from your key. Find it under Settings → Connectivity → Your player ID.
- To change your nickname later, choose your lobby card at the top of Customize, type the new one and choose Apply changes; your player ID stays the same. Or open a terminal in the client's folder (in File Explorer, right-click inside the folder and choose Open in Terminal; on Windows 10, hold Shift, right-click, and choose Open PowerShell window here) and run the following with your file's name (type
.\projectand press Tab to fill it in):
.\project-reclaimer-v0.8.14.exe profile rename "New Name"Your key can't be backed up or recovered yet. If you lose it, you get a new player ID, and a server that made you an admin will need your new one.
Customize your look
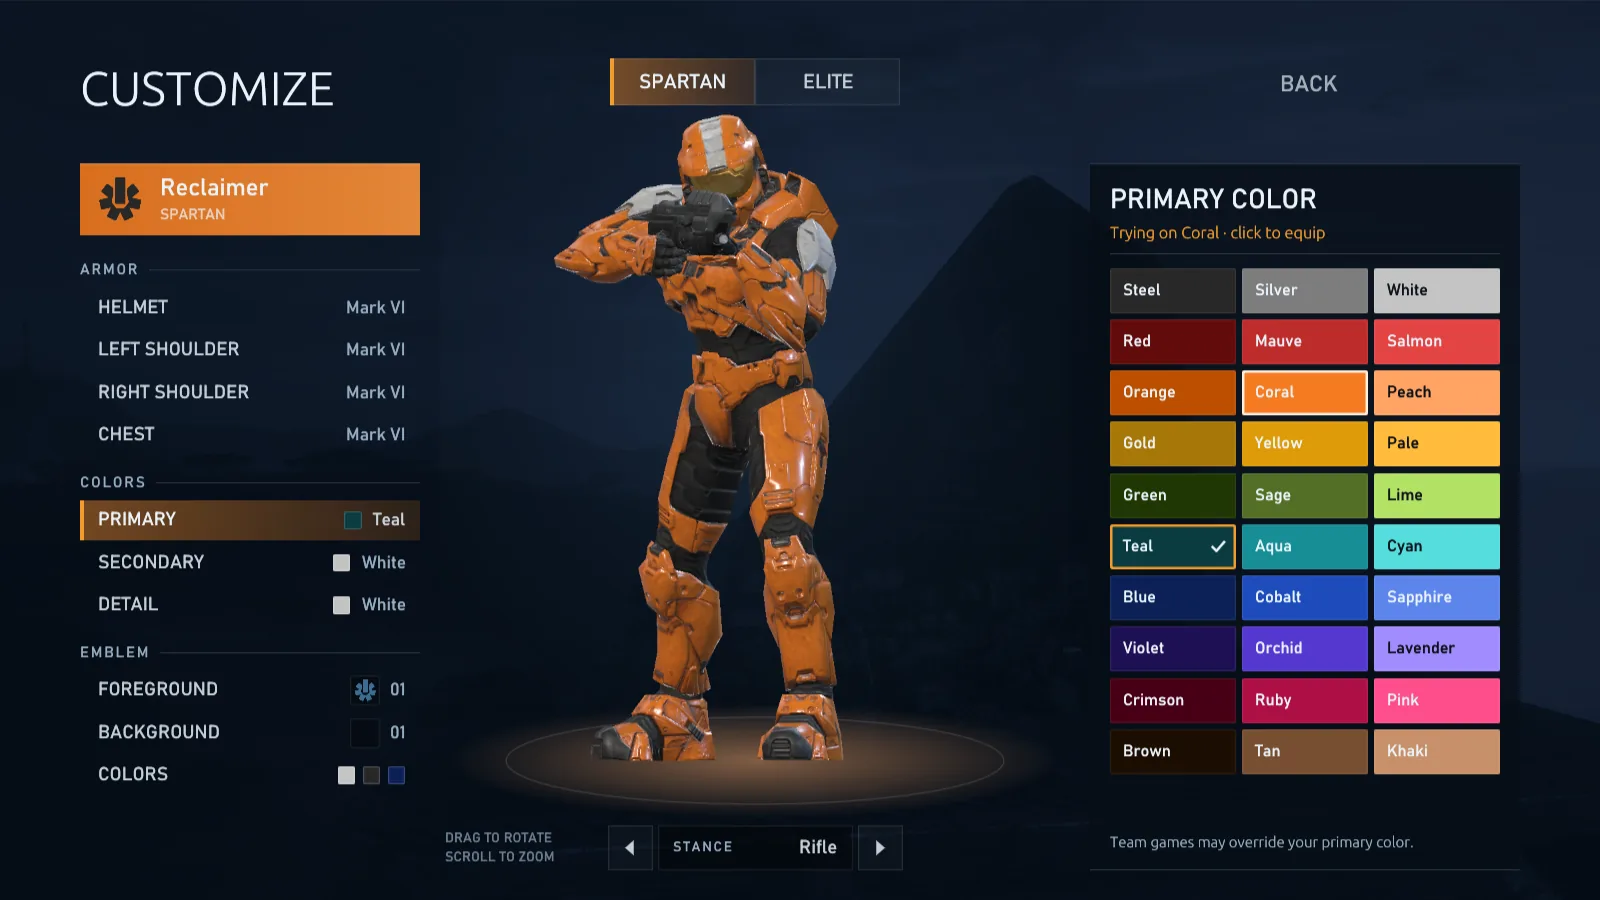
Choose Customize in the main menu to pick your armor, colors and emblem. Your character stands center stage, and everything you can change is listed on the left with what you have on.
- Your lobby card is at the top of the list, as other players see it. Customize opens on it with your whole character in view; change your player name and service tag there.
- Pick a row (helmet, shoulders, chest, the three armor colors, the visor and armor lights, or the emblem's foreground, background and colors) and its choices open on the right.
- Any armor color: on a color row, switch the panel from Palette to Custom for any color at all. Drag in the color field, use the Hue, Saturation and Brightness sliders, or type a hex code such as
#1E90FFand press Enter. Players and servers on 0.8.9 or later see your exact color; older ones see the nearest Halo 3 color, which the panel names. In team games your team's color still replaces your primary and secondary colors; your detail color stays your own. - Visor and armor lights: the Visor and Armor lights rows under Colors take a palette or custom color too, and Default gives the armor back its own. Choosing a visor color frames the helmet. Team colors never replace them. Players on 0.8.14 or later see them in game, in multiplayer and in co-op campaign games with your own characters, when the host or server runs 0.8.13 or later; older versions show the original visor and lights.
- Point at a choice to try it on: your character shows it straight away. Click it, or press Enter, to equip it. Nothing changes until you do.
- The camera follows what you're choosing: it closes in on the helmet, turns to show a shoulder and frames the chest. Emblem rows show a large view of your emblem. Drag to turn your character, scroll to zoom, and Reset View brings the camera back.
- Spartan and Elite sit above your character, and the stance they stand in below, with arrows to step through them.
- With the keyboard or a controller, the arrow keys move through the list and the choices, Enter or A steps into the choices, and Esc or B steps back out.
What you equip is saved at once and applies the next time you join a game, where everyone sees it.
Join a game
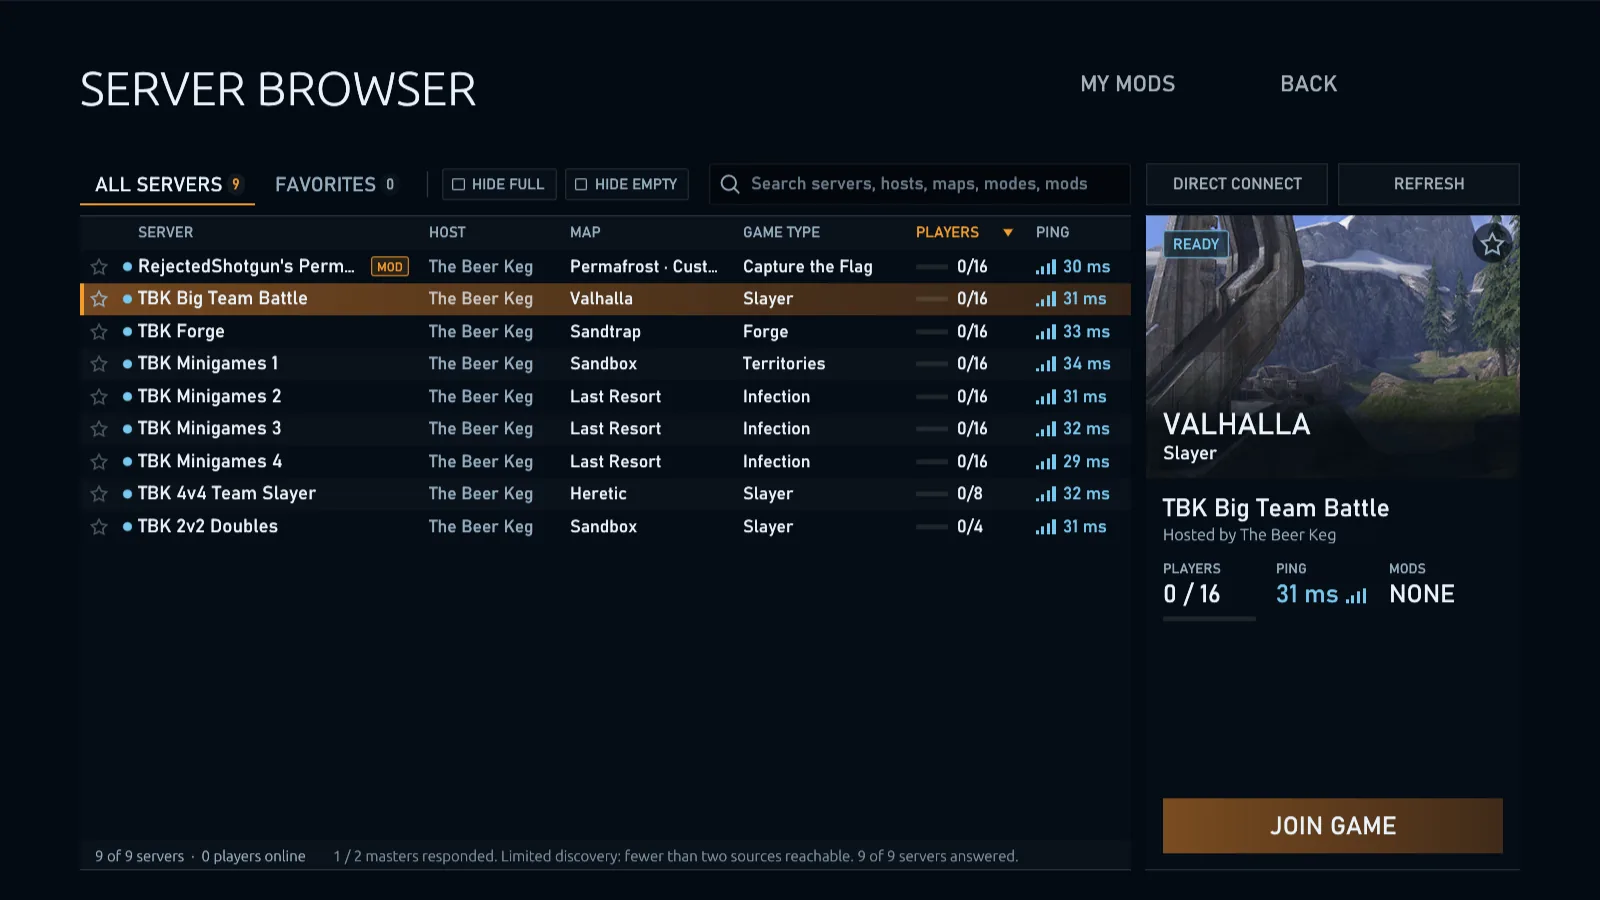
Choose Server Browser in the main menu. It finds community servers on its own, through the project's two public master servers and the other masters it learns about, then asks each server what it's playing. So the game, players and ping you see are live, and the list refreshes every time you open it.
Each server takes one line: a status dot, its name and tags, the host, map, game type, a player bar and ping bars, so 18 servers fit before the list scrolls. Map and Game type name the map variant and game variant the server is playing, such as a Forge map's own name, instead of only the base map and game type; a map as it ships shows its own name. Click a column title to sort by it, and again to reverse.
- Select a server to see its card beside the list: the map's art, players, ping, the names of the players on it, the mods it needs and what's left to download, and why it can't be joined if it can't. A server that runs another version of Project Reclaimer than yours says which, in gold when the server's is newer. Join Game is at the bottom of the card.
- See who's playing: point at a server's player count for the names, or choose View Players on its card for the full list, with Join Game to join from there. Servers need 0.8.14 or later to send their variants and players; older ones show the base map and game type and don't list their players.
- Double-click a server to join it straight away. With the keyboard or a controller, the arrow keys move from server to server and Enter joins the selected one.
- Hide full and Hide empty above the list leave out servers with no open slot or nobody playing. Search finds servers by name, host, map, game type, mod or player name, so you can type a friend's name to find the server they're on.
- The Ping column's bars and milliseconds are green under 110 ms, gold under 180 ms and red beyond. The Tab scoreboard shows ping the same way.
- Rows appear as servers answer. A server that doesn't answer within a few seconds is left out.
- Games and dedicated servers hosted on your own PC are listed too, even when your router doesn't pass its own internet address back into your home network. The game finds them on your PC and joins them there.
- Star a server to add it to Favorites. Favorites are asked directly at every refresh, so they show up even when no master lists them. The tabs show how many servers and online favorites there are.
Add a master server (optional)
Masters pass on the other masters they know, so you rarely need to add one. If a community gives you its address:
- Open Settings → ConnectivityFind the Master servers list.
- Add the addressFor example
http://play.example.com:49175or anhttps://address. - Apply and refreshGo back to the Server Browser.
How masters work together, and how to run one for your community: see Master servers.
Direct connect
If a friend gives you an address such as 203.0.113.4:11774, choose Direct Connect in the Server Browser, enter it and choose Connect. This also works for hidden servers that no master lists.
Private servers
A server or lobby with a password shows PRIVATE in the Server Browser. Joining it asks for the password, whether you join from the list, by Direct Connect or with a join link. A wrong password can be tried again or cancelled. Ask the host for the password; private servers need 0.8.10 or later on both sides.
While joining
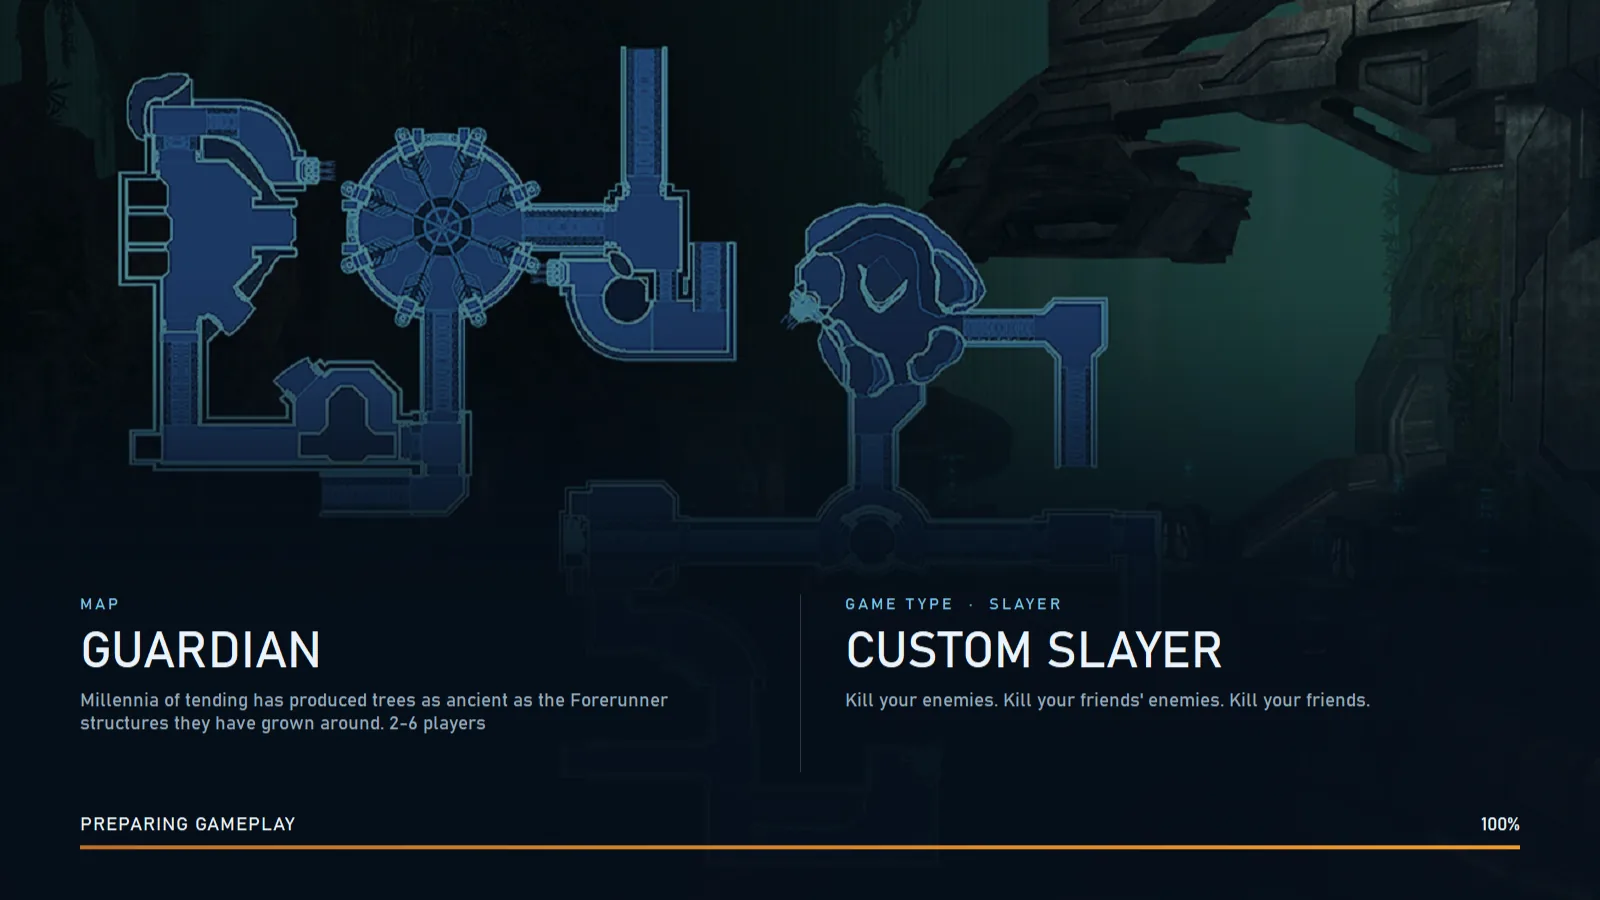
The loading screen shows the map and the game type side by side, with what each is about and who made them, over a progress bar. You can keep chatting while it loads, and a line you're still typing when the game starts stays open. Once you're in, Esc opens the game menu, headed with the server's name, with Resume game, Server Browser and Leave server. Leaving takes you back to the main menu, ready to join another game.
Switch servers
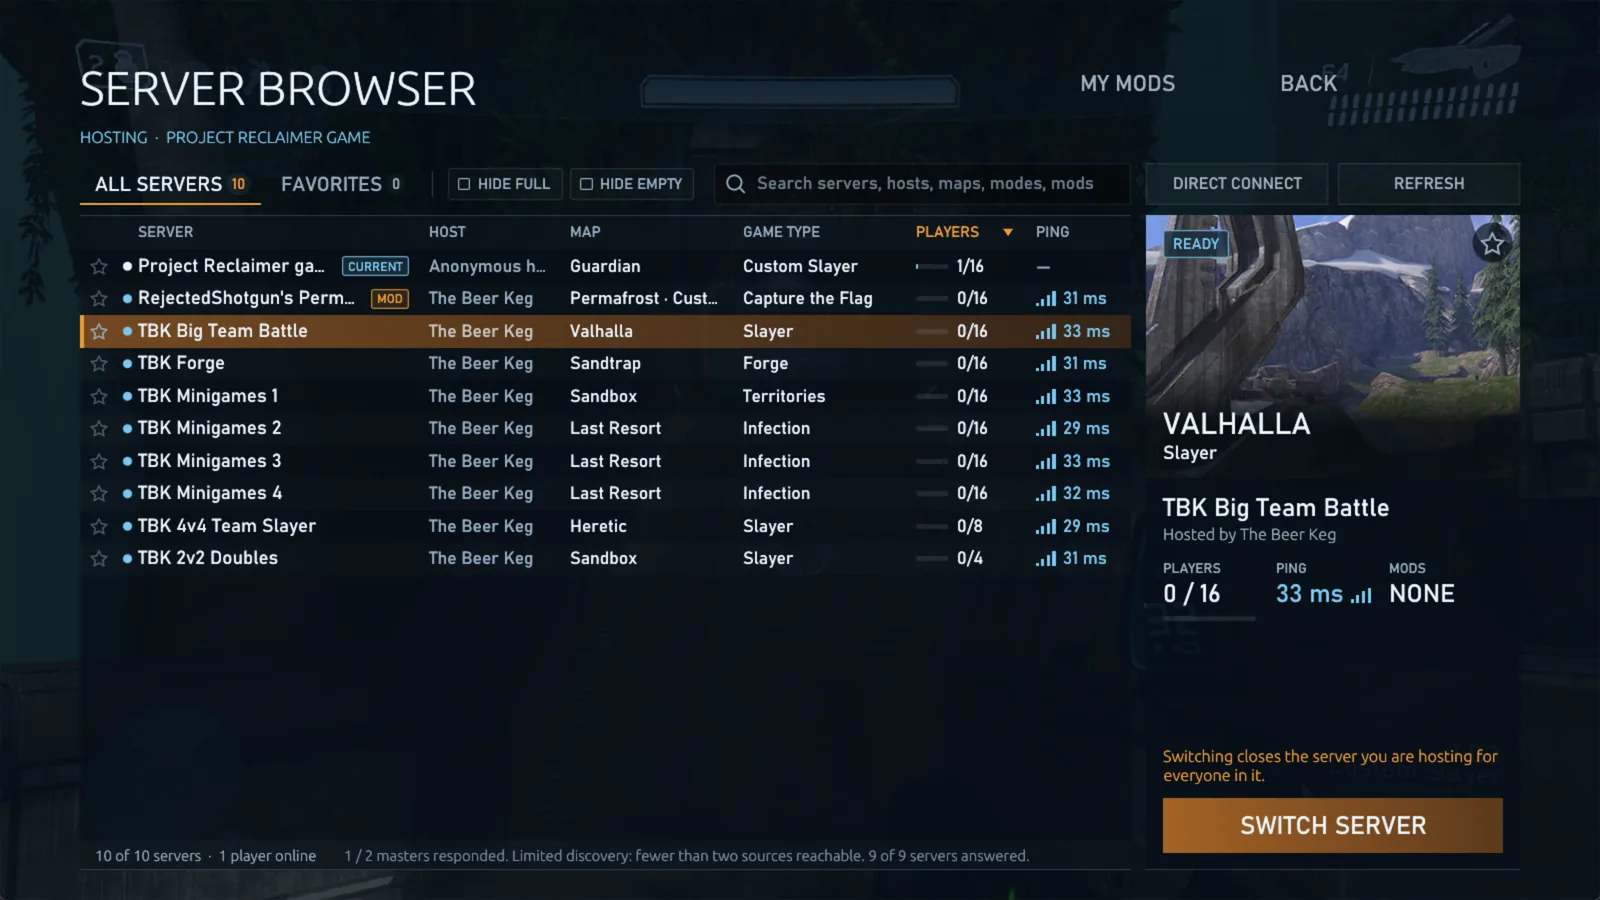
You don't have to leave a game to look for another. Press Esc and choose Server Browser: the list opens over the running game, with your current server marked. Select another server and choose Switch Server. You leave your game and join the new server as soon as the main menu is back. If it uses mods you don't have, they download first while you keep playing.
- If you're hosting, switching closes your game for everyone in it; the browser warns you first.
- In solo Forge, switching leaves Forge: save your map first to keep it.
Join from Discord
While Discord runs on your PC, your Discord status shows that you're playing Project Reclaimer, with the game type, map, server and player count, and a link to this site. On a public server, others also get a Join game button: it opens this site's join page, which starts Project Reclaimer and joins your server, or offers the download to people who don't have it yet.
- Discord shows the buttons to others only, so you won't see them on your own status.
- Hidden servers and servers you joined by address never get a Join game button, so their address stays private.
- If Project Reclaimer is already running, a join link switches it to that server. If you're hosting, or in solo Forge, it asks you first.
- Turn the status or its Join game button off in Settings → Connectivity, under Discord.
Host from the client
You can host a game for friends straight from the client, without setting up a dedicated server.
- Choose Host GameThis creates a lobby you control, in three columns: your game's setup on the left, the map, game type and lobby chat in the middle, and the players on the right, with the count against the limit.
- Pick a map and a game typeChoose Map or Game Type: every map shows as a card with its picture, every game type with its Halo 3 emblem. Click one to see what it is and its variants, then choose a variant or Use; a double-click uses it straight away. Search finds maps and variants by name. Slayer's variants include the scripted game modes Gun Game, Growth and One in the Chamber, and from 0.8.14 Zone Control: hold the zone around the first spawn alone to score, with a distance readout to help you find it. A scripted mode's own settings are under Game Options → Slayer rules → Custom mode options. Game Options changes any rule, such as score to win, starting weapons or player traits, and shows how many settings you changed in each category. A starting weapon set to Random gives players a new one every time they spawn.
- Choose who can joinStep Network with its arrows: Local is limited to players on this PC; Online lists your game publicly. Host Settings sets the server name, the Host name the Server Browser and lobby show (your nickname unless you type another, such as your community's; clear it to go back to your nickname), Max players (1 to 16, you and any split-screen players included), a Server password, voice and text chat and mod sharing, explains each one and previews how your server looks to other players; choose Apply Changes.
- Start the gameChoose Start Game under the setup rows. Everyone in the lobby gets a three-second countdown. Players who join see the same lobby, with Waiting for the host where Start Game would be.
To stop a game early, for example to change the map, press Esc (or Start on a controller) and choose End Game. Everyone goes back to the lobby together and nobody is disconnected. It works in custom games, Forge and co-op campaign.
Going online
- Online hosting tries to open your router's port automatically (UPnP). If your router doesn't support that, forward UDP 11774 to your PC, or set another port under Host Settings. It's the only port your game needs: players join on it and the Server Browser asks it what you're playing. Before 0.8.10 hosting also used TCP 11775, and before 0.8.9 the ports were 49176 and 49175.
- The lobby shows your server's address under its name, with a Copy button. Friends can use it with Direct Connect.
- You can host more than one game on the same PC. The Server Browser lists each of them under This PC. An Online game whose port another game on the PC already holds takes the next free one when your router maps it automatically; the Online status shows the port it uses.
- Your game reports to the project's public master servers, so it shows up in everyone's Server Browser without them adding anything.
- A Hidden server reports nowhere and is never listed; players can only join with Direct Connect. A game that was listed before you hid it drops off the list within three minutes.
- A Server password makes everyone who joins enter it, and the Server Browser marks your game PRIVATE. Players already in the game stay; clear the password to open it again.
- A player-hosted game ends when the host leaves. For a server that stays up, see hosting a dedicated server.
Maps and game types from others
Host Game lists the files in Documents\My Games\Project Reclaimer\Maps and Game Modes beside the installed maps and game types: the Forge maps and game types you save, and files other players give you, such as Halo 3 map variants (.mvar) in Maps and game variants (.bin) in Game Modes. Open folder in the Map or Game Type picker opens the folder; after adding files, choose Refresh.
- Compressed map variants, such as the
legacy_maps in community map packs, load from 0.8.14 on. A file that still can't be loaded says why, such as "Damaged compressed variant data": some files in those packs were damaged when they were renamed, and MCC can't read them either. - ElDewrito's Forge maps (
sandbox.map) and game variants (variant.slayerand the like) go in either folder and convert themselves the next time the game starts or you choose Refresh. See ElDewrito maps.
Campaign
Choose Campaign in the main menu to play Halo 3's missions from your installed game, alone or in co-op, as the Master Chief and the Arbiter or as your own Spartan or Elite. Each mission shows its picture and story, and the emblem of the hardest difficulty you have finished it on. Campaign mods get tabs of their own on the same page.
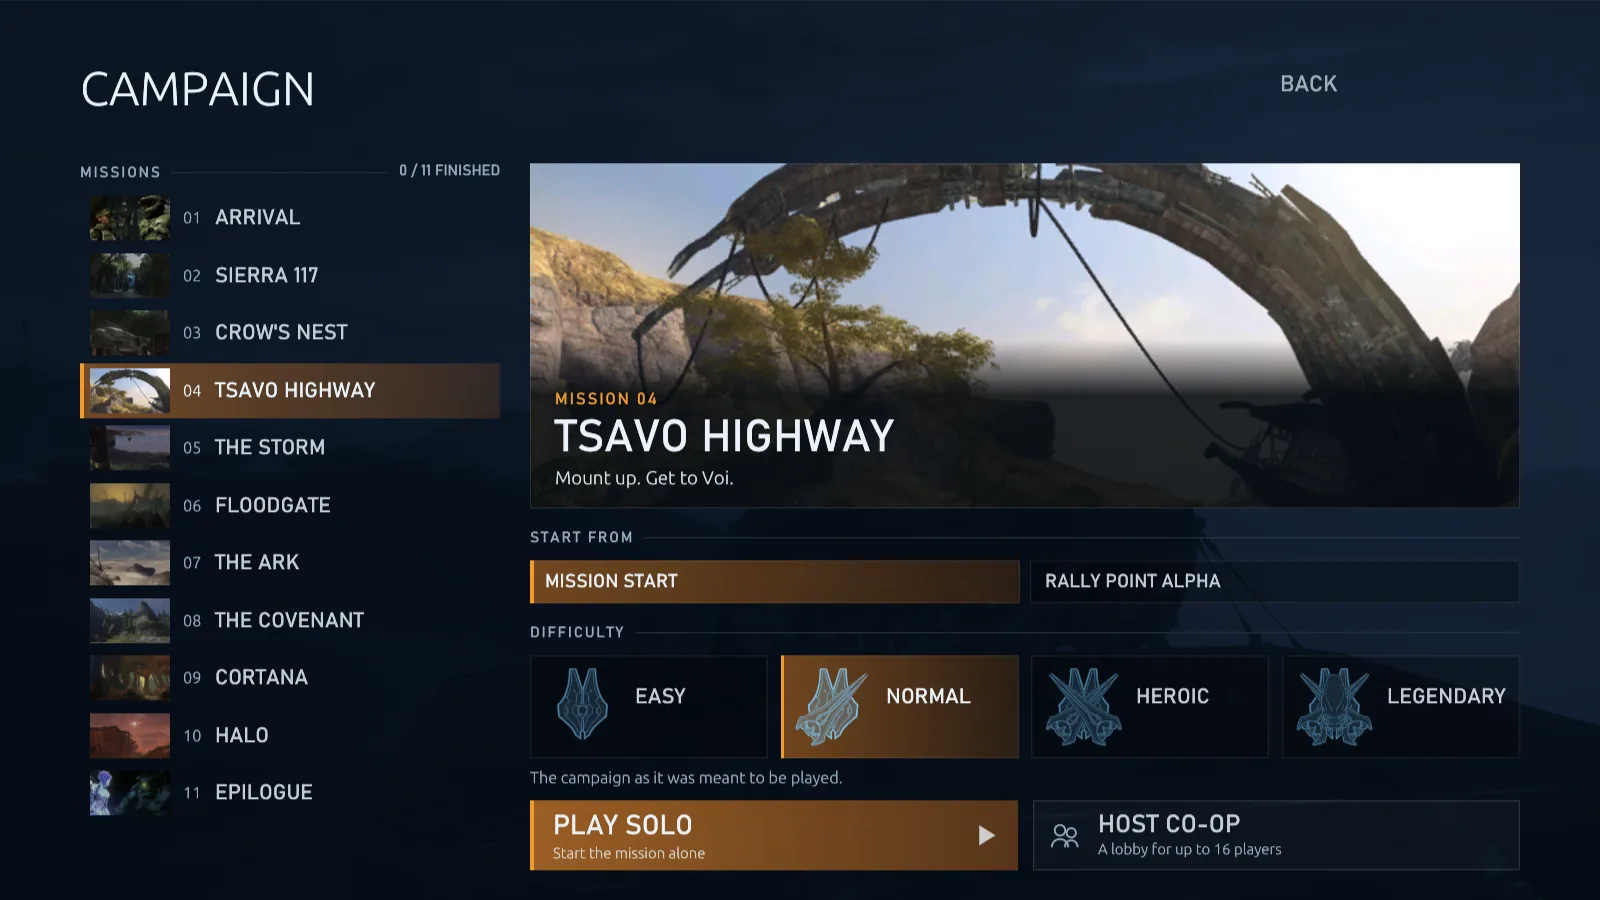
Solo
- Pick a missionChoose where it starts, Mission Start or one of its rally points, and a difficulty. The arrow keys move through the missions (up and down) and change the difficulty (left and right).
- Choose your charactersUnder Characters, Master Chief & Arbiter plays the campaign as it was. Your Spartans & Elites puts you in the mission as the Spartan or Elite you made in Customize, in your own armor, colors and emblem. Cutscenes still show the Master Chief.
- Choose Play SoloThe mission loads like any game.
- Your progress is saved. The game keeps your last checkpoint, so Continue at the top of the Campaign page picks up where you left off, even after you close the game, with the characters you chose. Finished missions are remembered per difficulty.
- Missions follow on. When you finish one, its screen shows what's next and the next mission starts a few seconds later, or at once with Continue Now. After the last mission you're back at the main menu.
- Esc pauses a solo mission. The game menu can also Revert to Checkpoint, Restart Mission or Quit Mission.
- Skip a cinematic with Space, or A on a controller, wherever Halo 3 lets you.
Co-op
- Choose Host Co-opOn the Campaign page, with the mission and difficulty you want. This opens a campaign lobby.
- Let players inSet Network to Online to list the lobby publicly. Players join it from the Server Browser like any game, or by Direct Connect.
- Set up and startIn the lobby, change the Mission, Start from, Difficulty and Characters, then choose Start Game.
- A co-op lobby takes up to 16 players, not just Halo 3's four, with up to four players in split screen on each PC. The missions look after every player, not just the first four: when a mission brings stragglers forward, everyone comes along, and when it seats players in a vehicle, the others take any seat still free and the rest join the group where the vehicle stops.
- With Your Spartans & Elites, everyone in the game plays as their own character, and everyone sees each other's armor and colors.
- Co-op missions start from the mission start or a rally point; your saved checkpoint is for solo play.
- Join a mission in progress: players can join while the lobby is playing. Everyone already playing keeps playing, with no pause, no loading screen and no return to a checkpoint. Only the newcomer waits, on their own loading screen (Joining the game in progress) while their game catches up, usually a few seconds, then spawns next to the others. Someone who joins during a cutscene waits until it ends. If the newcomer's game can't catch up, only they go back to the menu. The host and every player need 0.8.14 or later for this.
- Leaving doesn't interrupt anyone: when a player leaves, the others play on where they are, with no pause and no return to a checkpoint. A player whose game freezes or crashes doesn't hold up the others: after a second they play on, and a game that recovers catches up.
- Reverting to the last checkpoint after someone joined, because everyone died or from the game menu, brings the new players along: they respawn next to the others.
- The host skips cinematics for everyone, and can revert to the last checkpoint or restart the mission for everyone from the game menu.
- Everyone who finishes a mission has it recorded as finished, and the next mission starts for the whole lobby.
- Campaign games don't count toward your multiplayer rank or stats.
Campaign mods
Campaigns made with MCC's mod tools play on the same Campaign page, both mods that change Halo 3's missions and mods with missions of their own. Subscribe to one on the Steam Workshop, or put its folder, the one with CampaignInfo.json, in Documents\My Games\Project Reclaimer\Mods.
- One tab per campaign. The page's title row has a Halo 3 tab and a tab for each campaign mod, marked MOD, with its art, how many missions it has and how many you've finished. One click swaps the page to that campaign. Campaigns that don't fit beside the title go in the More list. With no campaign mod installed, the row says where to get one.
- Its own missions and progress. A mod's missions, pictures, starts and your progress through it are its own, kept apart from Halo 3's. Play Solo, Continue and Host Co-op work as they do for Halo 3's campaign, and a finished mission goes on to the mod's next one.
- Co-op: players who join your lobby without the mod get it the way they get a multiplayer mod: through the Steam Workshop, or from you when Host Settings → Share mod files is on. They download the whole campaign once, so the lobby can go on to the next mission. While players are in your lobby, its Mission page changes the mission but not the campaign, and the other campaigns' tabs are off. Everyone needs 0.8.14 or later.
- Mods turned off in Settings → Mods don't get a tab. Several campaign mods that change the same Halo 3 missions can be installed side by side.
- Your Spartans & Elites doesn't work on every mod's missions: some, built with newer mod tools, can't take the multiplayer characters, and load with the campaign's own characters instead.
Split screen
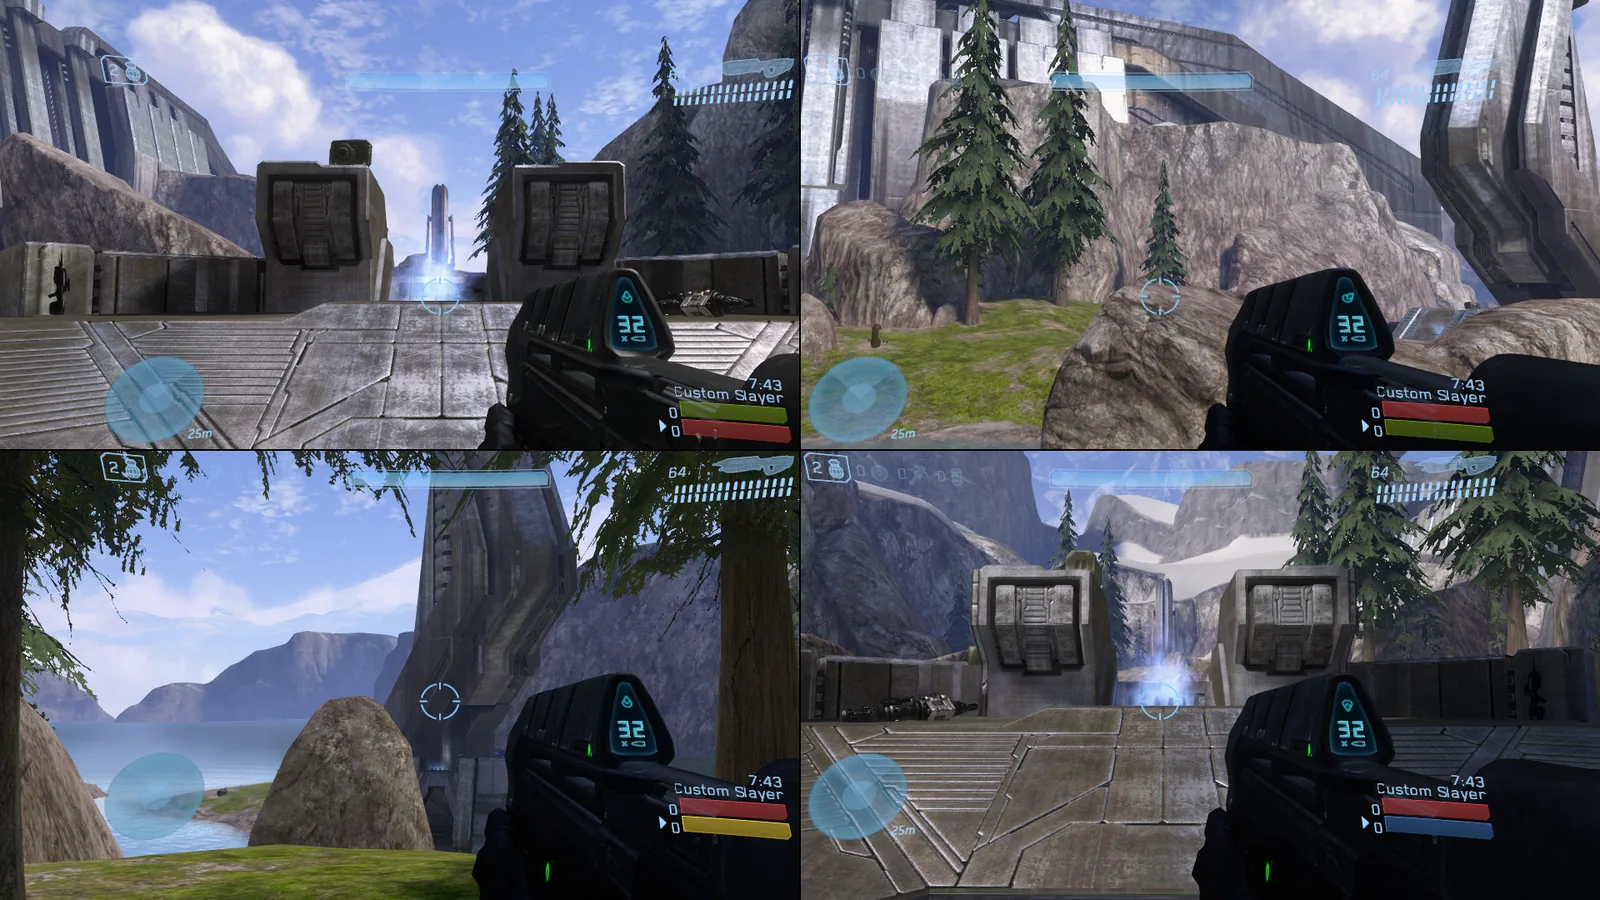
Up to three friends can play on your PC, each with a controller or a keyboard and mouse of their own. Every game splits the screen, whether you host it or join a server or a dedicated server, and each player gets their own view and HUD. Online, everyone at your PC joins the server together.
- Open Settings → Split screenFrom the main menu. Players are arranged there before a game, not in a lobby.
- Add a playerChoose Add a player, then a saved player from this PC, or New player… for one with its own name and player ID. Each keeps their name, ID and armor for next time.
- Claim a controller or keyboardThe new player presses a button on their controller, or a key on their keyboard and then a click of their mouse. Assign on a player's row does it again later.
- PlayHost a game or join one as usual. Everyone at the PC joins together.
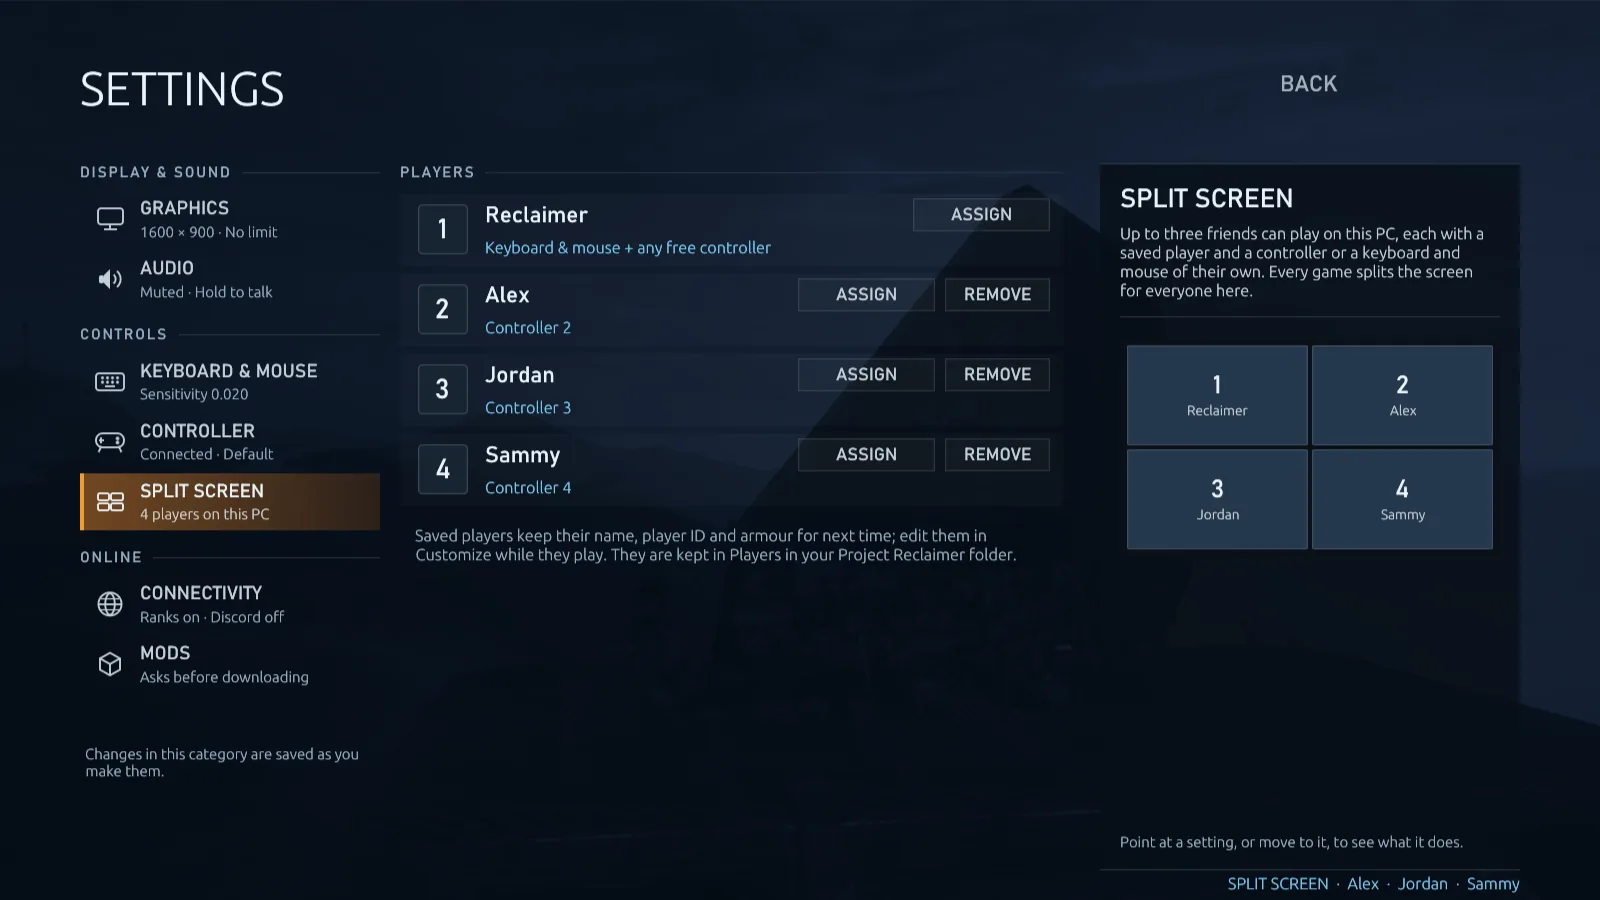
- You are Player 1, with every keyboard and mouse nobody else has and, until you pick one, any controller nobody else has. Assign on your row, then a key or mouse click, leaves you on the keyboard and mouse alone.
- Two players share the screen top and bottom. With three, the first is on top and the others side by side below; four take a quarter each.
- Halo 3 draws split screen with less detail than one player gets: no shadows or decals, simpler water and fewer lights. To give every view the detail of one player, choose a level in the split-screen part of Settings → Advanced graphics.
- A friend's keyboard and mouse play only for them, with your key bindings and look sensitivity. Controller players use the settings in Settings → Controller.
- While friends are seated, Customize has a player row, so their armor, emblem, name and service tag can be changed there too.
- The chat line, the pinned scoreboard and the Forge menu belong to Player 1, and stats services rank Player 1 only. Who plays lasts until the game closes.
- A server's Max players counts split-screen players too. The Server Browser only lets your group join a server with a place for each of you, and shows Room for 2 (say) when there isn't.
Mods
Mods add custom multiplayer maps, their objects to Forge, and campaigns. Servers list the mods their games use: when you join one with mods you don't have, the game downloads them, checks them and joins. Mods from the Steam Workshop come through Steam, and a server whose host shares its mods sends them itself. There's nothing to find or install first.
Servers with mods
In the Server Browser, a server whose games use mods has a tag beside its name with how many:
| Tag | Meaning |
|---|---|
| 2 mods | You have them all. |
| 2 mods | The ones you're missing can be downloaded, through Steam Workshop or from the server. Join and they download first. A mod you turned off shows this way too. |
| 2 mods | You're missing one with no download source: it isn't on the Workshop and the server doesn't share it. You can't join until you get it. |
Select a server and its card lists its mods with what's left to download; View Mods shows them in full. Search finds servers by mod name too.
Download and join
- Choose Download & JoinWhen you're missing a mod, Join Game reads Download & Join and opens Required mods: each mod's preview image, its maps, and exactly how much it needs to download, such as "312 MB (150 MB already on this PC)".
- DownloadChoose Download & Join. Each mod shows its progress, and the window the total, speed and time left. Cancel or Esc stops; an unfinished file picks up where it left off next time.
- PlayOnce every file is in place and checked, the game joins the server by itself. There's no restart.
- Tick Download the mods servers share without asking next time, or turn on Settings → Mods → Download without asking, and joining starts the download straight away. From 0.8.14 that goes for joining by address too, with Direct Connect or a join link. The window still shows its progress.
- Each file is checked against the server's list of fingerprints (SHA-256) before it's used. A damaged file is thrown away and downloaded again next time.
- A mod is downloaded once, however many servers use it. Files already on your PC, from another download, your Mods folder or Steam's Workshop folder, are copied instead of downloaded.
- Maps come in checked chunks. Joining from the Server Browser, you take them from that server and up to three other listed servers that share the same mod, all at once. A cut-off download resumes with the chunks it already has.
- For a Forge map with objects from a mod, you download just those objects, usually a few MB, listed as the mod's name followed by "(objects)".
- A download never replaces a different map with the same file name. If you have another version of a mod, its row reads "Map name clashes with mod on this PC": delete that version in Settings → Mods and join again.
- If the game can't add a new map while it runs, for example once a session has played 23 mod maps, the window offers Restart & Join: the game restarts and joins the same server once it's ready.
Through Steam Workshop
Most mods are Steam Workshop items, and a server says which item each of its mods comes from. With Settings → Mods → Prefer Steam Workshop on, as it is to start with, the game has Steam download those mods, then checks every file against the server's before it uses it. The host doesn't have to share anything for this.
- Steam has to be running, signed in with an account that owns MCC. If it isn't, the download window says Start Steam and sign in with an account that owns MCC to use Workshop.
- Steam downloads the whole Workshop item, which can be bigger than what the server uses, so it needs room in your Steam library too. Only the files the server's version needs are installed, in your Mods folder. The game doesn't subscribe you to the item.
- When the host shares its mods too, the server is the fallback: if Steam can't download an item, makes no progress for 45 seconds, or has a different version of a file, that file comes from the server instead. Without sharing, the window says what went wrong.
- Turn Prefer Steam Workshop off to download mods only from servers that share them.
Mods are map files only: Project Reclaimer never runs program code from a mod. The game wasn't built to distrust map files, though, so download mods only from servers you trust.
Install mods yourself
Mods you subscribe to on the Steam Workshop are listed automatically. To add one by hand, put its folder in Documents\My Games\Project Reclaimer\Mods, one folder per mod, and choose Refresh in Host Game. A mod's folder holds one of these:
- a package as the game's mod tools publish it, with its
ModInfo.json; - a
.mapfile with its matching.mapinfo; - a multiplayer
.mapon its own, with theshared.mapit came with if it has one. It's listed under its file name:blam_mountain.mapas "Blam Mountain".
A package that adds a campaign shows on the Campaign page, not in Host Game. Packages made for MCC's other games are skipped.
Workshop maps whose authors never gave them a map ID are listed too, and can be hosted, joined, shared and downloaded like any other mod map. Everyone in the game needs 0.8.12 or later to play one.
Manage your mods
Settings → Mods, or My Mods in the Server Browser, lists every mod on your PC with its maps, its size and where it came from: the servers it was downloaded from, your Mods folder or Steam's Workshop folder.
- The On/Off switch beside each mod turns it off without deleting it: its maps leave Host Game and its objects leave Forge. Steam Workshop mods can be turned off too.
- Joining a server that needs a mod you turned off marks it Disabled on this PC, and Enable & Join turns it back on and joins. The game never turns a mod on by itself.
- Delete moves a mod to the Recycle Bin. A server that needs it again offers it again.
- A mod the current lobby or game uses can't be turned off or deleted. Workshop items are left to Steam: turn them off here, or unsubscribe in Steam.
- Folder opens a mod's folder, and Open Mods Folder the folder that holds them all.
The Asset library section on the same page says whether Forge's objects from other maps and mods match the mods you have on. After you turn a mod off or on, or install or delete one, it says Your mods changed since it was built: choose Rebuild Now to build it in the background, with its progress beside the button, or it's built the next time you open Forge or start the game. Rebuild builds it again when it's up to date too. It isn't offered during a lobby or a game.
Host a game with mods
Pick a mod map in Host Game like any other map, or a saved Forge map with objects from mod maps. Players who lack a Steam Workshop mod download it through Steam, with nothing for you to set up. To send mods from your PC as well, for mods that aren't on the Workshop, players without Steam and the Forge objects of mod maps, open Host Settings and turn on Share mod files. Mod upload limit caps what all their downloads send together, 20 Mbit/s unless you change it (0 for no limit), so your own game stays smooth.
- Mods players have no way to download are listed under Players need in red, with a Share them button.
- Sharing needs an Online lobby: downloads use the game's own port and its encrypted connection. Players on the same PC use your files directly.
- Only the files of the mods your current games use are shared, nothing else on your PC. A mod's own sound banks go with its maps, even ones larger than Halo 3's, so players hear the mod's sounds.
- For a server that stays up, see mods on a dedicated server.
Lobby voting
When a lobby uses a playlist, its host doesn't pick the games. Before each game, the lobby shows a vote card instead:
- Three games (map and game type) and None of the above, with a countdown. The three are drawn at random from the whole playlist, and the game just played sits out the next vote.
- Click a game to vote. You can change your vote until time runs out.
- The game with the most votes is played. If nobody votes, the first game offered starts. If None of the above wins, a new ballot opens with games that haven't been turned down yet.
- The host can end the vote early with End Vote and Start Now.
To host with a playlist yourself, choose the Playlist row in your Host Game lobby's setup. To make a game come up more often, choose Edit on the playlist, select the game and drag Weight (1 to 100, 1 to start with): a game with weight 2 comes up twice as often as one with weight 1, and the share of the playlist's total weight shows beside it. See custom playlists for how to build one.
Controls
Movement, aiming, shooting and other game actions use the game's own key bindings. Click the game window to capture the mouse.
| Key | Action |
|---|---|
| Esc | Game menu, with the server's name: Resume game, Server Browser, Leave server, and End Game for the host. In menus, go back. |
| Tab hold | Scoreboard with every player's service tag, rank, score, kills, deaths, assists and ping, and the server's name. |
| Tab tap | Pin the scoreboard: frees the mouse to mute players, call votes or, for admins, kick and ban. Tap again to close. |
| T | Chat to everyone. |
| Y | Chat to your team (team game types only). |
| V hold | Talk on voice chat, or tap to start and stop with Talk mode set to Toggle. |
| F1 | Release the mouse cursor. |
| F2 / F3 | Halve / double mouse sensitivity (saved automatically). |
| F5 / F6 | Vote yes / no on an open player vote. |
| ` | Forge: switch between playing and editing. See all Forge keys. |
| 1 | Forge: open the Forge menu while editing. |
| Ctrl+C / X / V | Copy, cut and paste in any text box, the chat line and the Forge search. Ctrl+Insert, Shift+Delete and Shift+Insert work too. Passwords can be pasted but not copied. |
The scoreboard's Ping column is each player's round trip to the host or server in milliseconds, with the Server Browser's signal bars: green under 110 ms, gold under 180 ms and red beyond. Split-screen players show the ping of the PC they play on, and a playing host shows 0 ms. A dash means there's no recent reading, for example on a host or server older than 0.8.13.
In the main menu, ↑ ↓ and Enter navigate, Tab moves between controls and Esc goes back.
Every key above except Esc and the clipboard keys, and every game action, can be changed in Settings → Keyboard & Mouse.
Dual wielding: hold Dual wield (C) near a weapon to take it in your left hand. Fire left weapon (the right mouse button) fires it and Reload left weapon (F) reloads it; those keys throw grenades and zoom again once you hold one weapon. Hold Action (E) to trade your weapon for the one on the ground.
With a controller
An Xbox controller, or any other that Windows offers through XInput, works as soon as Windows sees it. The game follows whichever you touched last: press a button or push a stick and the controller takes over; press a key or move the mouse and it hands back. Button prompts follow too.
| Button | Action |
|---|---|
| A / B | Jump / melee |
| X / Y | Use equipment / switch weapons |
| RT / LT | Fire / throw a grenade, or fire the left weapon while dual wielding |
| RB / LB | Action and reload / switch grenades; LB held near a weapon dual wields it and reloads the left weapon |
| Left / right stick click | Crouch / zoom |
| Back | Scoreboard; a tap pins it, like Tab |
| Start | Game menu, like Esc |
In the menus, the D-pad and left stick move between controls, A selects, B goes back, and RB and LB move to the next and previous control like Tab. Push-to-talk and the vote answers have no button until you choose one in Settings → Controller, which changes any button and sets look sensitivity, invert look, stick layout (Default, Southpaw, Legacy or Legacy southpaw) and vibration. Typing in chat still needs the keyboard.
Chat, voice and player votes
Text chat
Press T for everyone or Y for your team, type, and press Enter. Tab switches between the two while you type; Esc closes the box and clears your line. A message can be up to 360 characters, a little less when it's mostly Chinese, Japanese or Korean or mostly emoji. Chat works the same in the lobby, on the loading screen while a map loads, in game and over the carnage report.
- Unsent lines wait. If the box closes without sending, for example after a click elsewhere, your line is kept: press T or Y and it's still there. Only Enter (sending it) and Esc clear it.
- Chat carries on between games. A line you're typing when a game ends stays open over the carnage report, and goes with you through the lobby and the next map's loading screen into the next game. Press T or Y on the carnage report to chat there; while you type, Enter sends your line instead of closing the report.
With chat open, a scroll bar lets you read back through the last 100 lines: use the mouse wheel, drag the bar, or press Page Up and Page Down. New lines don't move you while you read; scroll back to the bottom and chat follows new lines again. To copy lines, drag over them and press Ctrl+C; Ctrl+V pastes into the chat line.
Voice chat
Hold V to talk. Set Settings → Audio → Talk mode to Toggle to press V once to start and again to stop; talking pauses while another window is in front. Microphone device picks which microphone to use, and Microphone: Disabled never opens one. Without a microphone you can still listen. To mute someone, tap Tab and click the speaker button on their row. Hosts can turn voice chat off for everyone.
Voice chat volume in Settings → Audio sets how loud you hear other players; at zero you hear nobody, and they can still hear you. When the game drowns out your team, lower Game audio volume instead: it turns down the game's effects, dialogue and music and leaves voices as they are.
Player votes
On servers that allow it, players can vote to kick a player, end the round, end the game or shuffle the teams. Tap Tab and use Vote Kick on a player's row, or Shuffle, End Round or End Game in the title row, or type /vote kick <name>, /vote shuffle, /vote endround or /vote endgame. Vote with F5 (yes) and F6 (no), or type /yes or /no. A vote passes when more than half of the players have voted yes, and lasts 30 seconds.
Shuffle is for lopsided team games: when it passes, every player, split-screen guests included, is dealt at random across the teams in play, so no team has more than one player more than another. Team scores stay with their teams, and it evens out player counts, not skill.
Ranks and service record
Games on servers that report to the project's stats service count toward a Halo 3 rank, from Recruit up to General. Dedicated servers report unless their host turns it off.
- Every player's rank insignia shows on their lobby card, on the Tab scoreboard and in the carnage report, after their name and service tag. Players without a record yet show Recruit.
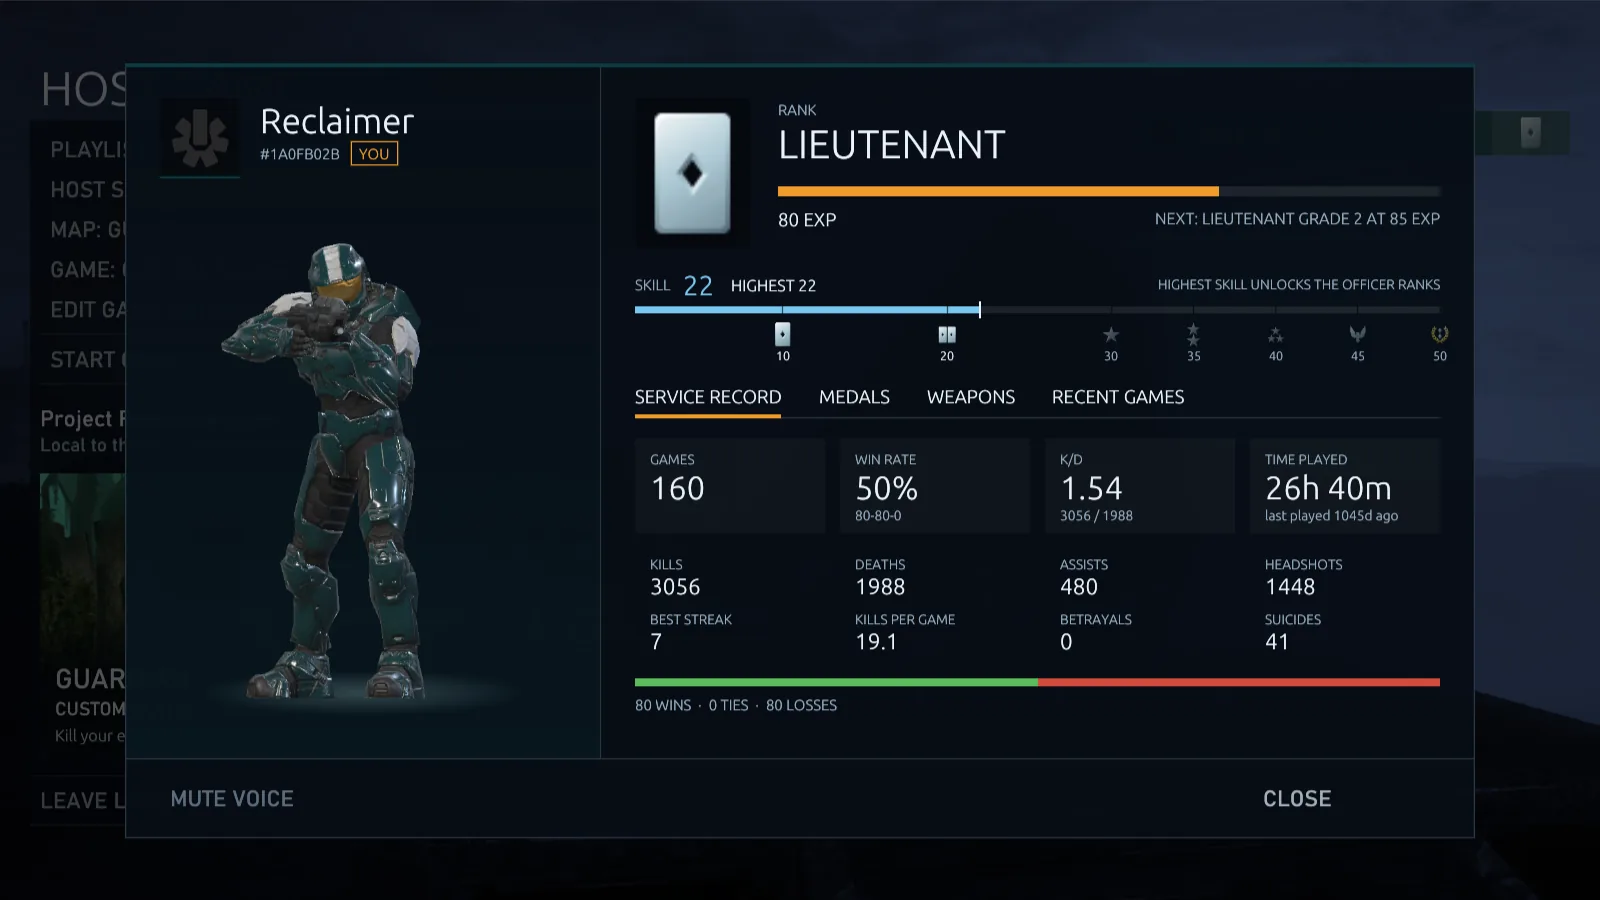
- Click a player in the lobby to open their details: their character, their rank with the EXP toward the next one, and a skill meter that marks the officer ranks.
- Tabs below hold their Service Record (games, win rate, K/D, time played), Medals (with Halo 3's own medal icons, and MCC's for the medals MCC added), Weapons (kills with each) and Recent Games. ← and → switch tabs, Esc closes the window.
Forge
Build maps alone or with friends in Halo 3's Forge, with blocks, cylinders, triangles, domes, half cylinders and equilateral triangles in every size with any material, walls that players, vehicles or projectiles pass through, objects from every installed multiplayer map, Halo 3's AI to fight, kill and garbage volumes and switchable map boundaries.
- Start an editing sessionIn Host Game, choose a map and choose Forge as the game type. Choose Solo Forge to edit alone, or Start Game to let friends join and edit with you.
- EditPress ` to switch between playing and editing, and 1 for the Forge menu. Aim at an object and press 1 to edit its properties. While you hold an object, the mouse wheel pushes it away or pulls it closer.
- Save your mapPress Esc and choose Save Map. There is no autosave, so save before you leave.
- Play itYour saved map appears under Maps in Host Game. Pick it with any game type, or add it to a playlist.
Scenery you place with Fixed physics freezes when you let go of it, so a map can hold up to 5,000 objects past Halo 3's 640 placements; grab one to move it again. Hold Shift and turn the mouse wheel to fly the monitor slower or faster, and teleport it from the Forge menu's Map tab, where the Sky row also puts another map's sky over yours. While you edit, the bottom-right of the HUD shows how many objects the map holds against its limits. ElDewrito's Forge maps and game variants convert themselves when you put them in your Maps or Game Modes folder. The Forge page covers primitives, materials, passthrough, AI, the menu, volumes, rotation, frozen objects, skies, limits and every Forge key.
Settings
Open Settings from the main menu or the game menu. The categories run down the left, each with its current state at a glance, such as your window size and frame limit, your volume or whether a controller is connected.
- Point at a setting, or move to it, and the panel on the right explains it: what it does, when it takes effect, what you had saved and what the default is. Many come with a picture that follows your choice, such as your field of view drawn from above, the game's window on your display, the keys of a binding or the controller with the button lit.
- On and off settings are switches you click once, lists are choices you step through with ◀ and ▶, and sliders show where their default sits.
- Changed settings are marked with a gold dot, and the box under the categories counts your unsaved changes, with Apply changes and Discard. With nothing unsaved it offers Restore defaults for the category you're in. Display changes ask you to keep or revert them.
- With the keyboard or a controller, the arrow keys (the D-pad) move through the categories and settings, left and right change the setting you're on, Enter or A switches it, and Esc or B steps back to the categories.
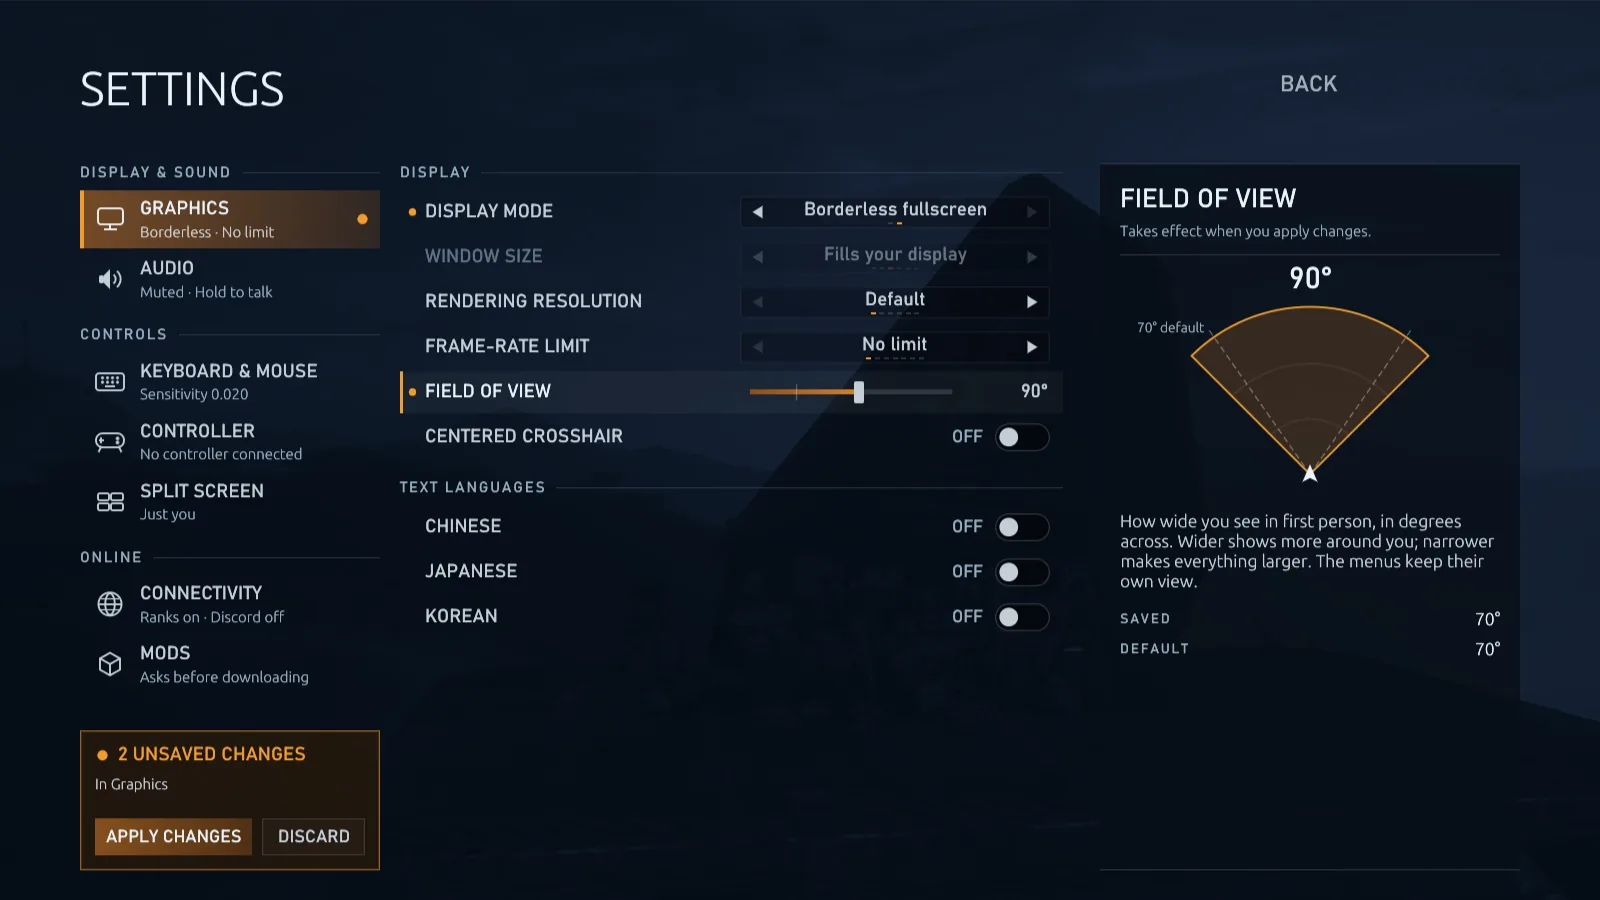
The categories:
- Graphics: field of view in games and, separately, in vehicles (each 55–120°, 70 to start with, split-screen players included), borderless fullscreen (the default) or windowed, window size, render resolution from 1280×720 to 3840×2160, a frame-rate limit (30 to 240 FPS, or none), VSync, centered crosshair and text languages. VSync (off to start with) stops the picture tearing in fast turns; the game then draws no faster than your display refreshes, and a lower frame-rate limit still applies.
- Advanced graphics: how much detail the game draws, for one player and for split screen, with texture filtering, antialiasing and motion blur. See Advanced graphics.
- Audio: master volume, game audio volume (the game's effects, dialogue and music, apart from voice chat and the menus), mute, and mute when the game isn't focused. Under Voice chat: how loud you hear other players, whether to use a microphone, which one, and whether the talk key is held or toggled. The menus make Halo 3's own cursor, confirm and back sounds, at the master volume.
- Keyboard & Mouse: mouse sensitivity on MCC's scale, so the value you play with in MCC feels the same here (0.05 to 20, 1.5 to start with, which Restore defaults returns to; the panel shows how far the mouse moves for a full turn at 800 and 1600 DPI), mouse smoothing (set 0% for raw, unfiltered input), and key bindings: every action can take two keys or mouse buttons, and Delete or Backspace clears one.
- Controller: look sensitivity (0.25–4×), invert look, stick layout, vibration, and a button for every action, kept apart from the keyboard's.
- Connectivity: master servers, your player ID, the stats service the client shows ranks from (the project's public one unless you change it), and your Discord status.
- Mods: every mod on your PC with a switch to turn it off, whether to download through Steam Workshop and whether joining downloads a server's mods without asking, and the Forge asset library with its Rebuild button. See Mods.
- Split screen: the players at this PC, each as a card with their number, name and controller or keyboard and mouse. See Split screen.
- Folders: the MCC installation the game runs from and the folder that holds its caches. See Folders.
Advanced graphics
Settings → Advanced graphics sets how much detail the game draws. It has three parts, and changes take effect as soon as you apply them, during a game too.
- Image: Texture filtering keeps floors and walls you see at an angle sharp. Original, the default, filters each surface the way the game made it, 4× anisotropic on most; 4×, 8× and 16× anisotropic filter every surface at that level. Antialiasing (the game's own FXAA) and Motion blur are on to start with and can be turned off.
- One player: a Preset of Low, Medium, High or Ultra sets the seven settings below at once, or set each on its own. High is what the game drew before these settings, Medium is the Xbox 360's own detail, and Ultra goes past both.
- Split screen: Halo 3 draws split screen with less detail than one player gets: no shadows or decals, the simplest water and fewer lights, and less again with three or four players. Auto, the default, keeps that. Any other level draws every view on the screen the way one player gets it at that level. More detail on four views asks more of your graphics card.
| Setting | Levels | What it changes |
|---|---|---|
| Shadows | Off, Low, Medium, High, Ultra | How many objects cast shadows and how sharp they are. Low and Off also take away your own shadow; Ultra lets every object cast one. |
| Dynamic lights | Off, Low, Medium, High | How many lights from gunfire, explosions and effects light up the world, and how far away they still do. |
| Effects | Low, Medium, High, Ultra | How far away explosions, sparks and smoke keep their full detail. |
| Draw distance | Low, Medium, High | How far away grass, scenery and objects stay drawn. High draws them as far as the game can. |
| Level of detail | Low, Medium, High, Ultra | How far away characters, vehicles and objects keep their most detailed models. |
| Decals | Off, Low, High | Bullet holes, scorch marks and blood on walls and floors. |
| Water | Low, Medium, High | Water's waves and reflections. |
A preset sets each setting to that level, or to the nearest level above it that the setting has. Change one setting and the preset reads Custom. As everywhere in Settings, the panel on the right explains the setting you're on, and in the split-screen part also what Auto draws for it.
Folders
Settings → Folders shows the Halo: The Master Chief Collection folder the game runs from and the folder it keeps its caches in: the Forge library of every map's objects and the fonts for HUD text. Each has Change… to choose another folder and Open to show it in Explorer.
- MCC folder: choose the MCC folder, its Steam library or its
halo3folder, for example when you have MCC installed in more than one place. The game restarts to run from it. - Cache folder: choose a folder on another drive to free up space on this one. The game restarts and moves the cache there; Move It Back returns it to the default folder. A folder that already holds other files gets a
ProjectReclaimerfolder of its own inside it. - Folders change from the main menu, not during a game. Dedicated servers on the same PC use the cache folder you choose too.
Centered crosshair
Turn on Settings → Graphics → Centered crosshair to put the crosshair in the middle of the screen instead of Halo 3's lowered spot. Your aim moves with it, and your weapon's position adjusts to match, using Halo 3's own hidden option for it. Split-screen players get it too.
Text languages
The game's own text, such as player names in the HUD, leaves out Chinese, Japanese and Korean characters unless you ask for them, which keeps its fonts to a few MB. Those characters show as boxes until you turn on Chinese, Japanese or Korean under Settings → Graphics → Text languages and restart the game. Chinese or Japanese adds about 160 MB (the two share most of it), Korean about 50 MB. The menus show every language either way.
Troubleshooting
| Problem | What to do |
|---|---|
| “Windows protected your PC” when you open it | The download isn't code-signed, so Windows doesn't recognize it yet. Check its checksum, then choose More info → Run anyway. |
| Microsoft Defender stops it with “Trojan:Win32/Bearfoos.A!ml” | A false alarm: !ml means Defender's automatic scanner guessed from how the game works, not that it found anything harmful. 0.8.8 makes this much less likely. Check the file's checksum, then open Windows Security → Virus & threat protection → Protection history, select the entry and choose Allow on device. |
| It says campaign files are missing | Project Reclaimer needs Halo 3's campaign. In Steam, check that Halo 3 is installed under Halo: The Master Chief Collection → Properties → DLC, then use Installed Files → Verify integrity of game files. |
| The client can't find the game | It asks you for the folder. Choose Halo The Master Chief Collection in steamapps\common in your Steam library (see First launch). Once the game runs, Settings → Folders changes it. |
| The game closes with an error | The message says why. The client's log is in Documents\My Games\Project Reclaimer\Logs\client.log, and the start before in client.previous.log; include them when you report a problem. Each line starts with the time it happened. |
| The game closes right after starting, with “no memory free near the game” in the log | Other software on the PC took the memory the game needs next to Halo 3. Fixed in 0.8.14: download it from the download page. |
| A map's loading screen doesn't go away | Since 0.8.13, client.log notes every 10 seconds what the loading screen is still waiting for. If it never goes away, close the game and send the log along when you report it. |
| After a game, the loading screen says “Synchronizing players” instead of showing the lobby | Fixed in 0.8.14: the lobby and its vote show after every game. Update from the main menu. |
| It says the game version isn't supported | A Steam update changed the game's engine file. Wait for a Project Reclaimer release that supports the new version. |
| The first launch is slow | The text fonts and the Forge library are being built, which takes about half a minute. The library is built again once after each update, and the fonts after an update that changes them, such as 0.8.11's lighter HUD font. |
| Mouse sensitivity changed after updating | 0.8.11 put mouse sensitivity on MCC's scale and set every saved sensitivity to the new default, 1.5. Set yours again in Settings → Keyboard & Mouse, for example to the value you use in MCC. F2 and F3 still halve and double it in a game. |
| The frame rate stays at 60 | Before 0.8.12 the game capped itself at 60 FPS whatever the limit. Update, then choose a higher Frame-rate limit or No limit in Settings → Graphics. |
| Players spawn with the wrong grenades | Before 0.8.12, Starting grenades in Game Options had None and Map default swapped. The labels now match, but game types you saved with either keep the value they had: check them in Game Options. |
| The picture tears when you turn quickly | Turn on VSync in Settings → Graphics and apply it. |
| Split screen has no shadows and looks plainer than playing alone | That's how Halo 3 draws split screen. Since 0.8.15 you can choose a level for split screen in Settings → Advanced graphics; High draws every view the way one player sees the game by default. |
| The scoreboard shows a dash for ping | There's no recent reading for that player, usually because the host or server runs a version older than 0.8.13. |
| Pickup prompts show huge weapon or button icons | Fixed in 0.8.13. Update from the main menu; the text fonts are rebuilt once when the game starts. |
| Names show as boxes | They use Chinese, Japanese or Korean characters. Turn that language on under Text languages and restart. |
| The menus don't appear | Update your graphics driver; the menus need OpenGL 3.0 or later. |
| Friends can't join the game you host Online | Games hosted Online use UDP 11774, and since 0.8.10 only that port. If you forward ports by hand, forward it, or set your old port in Host Settings. A forward for TCP 11775 is no longer needed. |
| Hosting Online says “Manual setup may be needed” although UPnP is on in your router | Before 0.8.15, once another program had looked for devices on the network through Windows, such as the Network folder or a media or casting app, the game's search for the router stayed on your PC for minutes. 0.8.15 searches over the connection that reaches the internet: update from the main menu and host again. If it still says so, forward UDP 11774 by hand. |
| A server asks for a password | It's private. Ask its host for the password; a wrong one can be tried again. Private servers need 0.8.10 or later. |
| Continue is gone after updating | Checkpoints saved before 0.8.10 can't be continued. Play the mission again from the mission list. |
| My campaign mod doesn't show | Check that it's a Halo 3 campaign mod made with MCC's mod tools, with a CampaignInfo.json in its folder, and that its folder is in your Mods folder or Steam has finished downloading it from the Workshop. Check that it isn't turned off in Settings → Mods, then open the Campaign page again. See Campaign mods. |
| The Server Browser is empty, or few masters responded | No master answered in time. Since 0.8.12 the game waits longer for them, which helps far from the masters or on a connection that drops packets. Refresh, or add a master under Settings → Connectivity. Favorites are asked directly either way. See master servers. |
| “Could not join that server.” | The server may be offline or its ports closed. Ask the host for the address and try Direct Connect. |
| A join fails and says the server or your game needs an update | You and the server run different versions of Project Reclaimer, and the game uses something only the newer one has, such as new Forge objects or another map's sky. If yours is older, update from the main menu; if the server's is, ask its host to update. The server's card in the browser shows its version. |
| “This server is full” | The server has reached its player limit. Try again later or pick another server. |
| “That server has no room for all 4 of you” | Split-screen players count toward the server's limit and join together. Pick a server with room for everyone, or remove a player in Settings → Split screen. |
| Refused for missing maps or mods | The message names what the game needs. Install those maps from your game, or get the mods (see Mods), and join again. |
| “Missing matching map” although Required mods says you have every mod | Your copy of the mod's map got a different map number than the server's, often right after it downloaded. Fixed in 0.8.14: a join finds the server's map by its files. Update from the main menu and join again. |
| A map “clashes with” a mod on this PC | You have another version of that mod. Delete it in Settings → Mods and join again. |
| A map variant was skipped with “Invalid content chunk size” | It's a compressed variant, such as the legacy_ maps in community map packs. 0.8.14 loads them: update and choose Refresh in Host Game. If it then says “Damaged compressed variant data”, the file itself is damaged and MCC can't read it either. |
| An ElDewrito map or game variant stays in Maps or Game Modes | It couldn't be converted: its base map isn't installed, it needs an ElDewrito mod, or it has more objects that move than its base map has room for. client.log says which. See ElDewrito maps. |
| A mod says “No download source” | It isn't a Steam Workshop item the server knows, and the host doesn't share it. Ask them to turn on sharing, or to give you the mod for your Mods folder. |
| A download says “Start Steam and sign in…” | The mod comes through Steam Workshop, which needs Steam running and signed in with an account that owns MCC. Start Steam and join again. If the host shares its mods, the game downloads from the server meanwhile. |
| “This mod requires Steam Workshop” | The server doesn't send mods itself, so they only come through Steam. Turn on Settings → Mods → Prefer Steam Workshop and join again. |
| A mod says “Disabled on this PC” | You turned it off in Settings → Mods. Enable & Join turns it on and joins. |
| Kicked from a server | You can rejoin after two minutes. A ban lasts until the server's admins lift it. |
| The mouse doesn't control the game | Click inside the game window. F1 releases the cursor again. |
Still stuck? Report the problem with the steps that led to it. Your settings and profile are in Documents\My Games\Project Reclaimer, wherever Windows keeps your Documents. Don't share your profile file from that folder: it holds your private key.